Build a Beautiful DIY Garden Arch for Your Yard
Imagine having a stunning garden arch in your yard. It’s a place where your favorite climbing plants can grow. You can enjoy the beauty of nature right in your own space. Building a DIY garden arch is easy and affordable.
Materials like cattle panels cost about $20 to $25 each. T-posts are around $5 to $6 each. With these, you can create a beautiful spot for your plants to thrive.
Learning to build a garden arch is fun and rewarding. You can use garden arch plans to help you. This way, you can make a beautiful and useful garden arch for your yard.
Building a DIY garden arch brings many benefits. It helps with vertical gardening, increasing crop yield and making harvesting more efficient. You can grow many plants, like cucumbers, pumpkins, and beans. Enjoy your garden’s beauty all year round.
Table of Contents
Understanding the Beauty and Purpose of Garden Arches
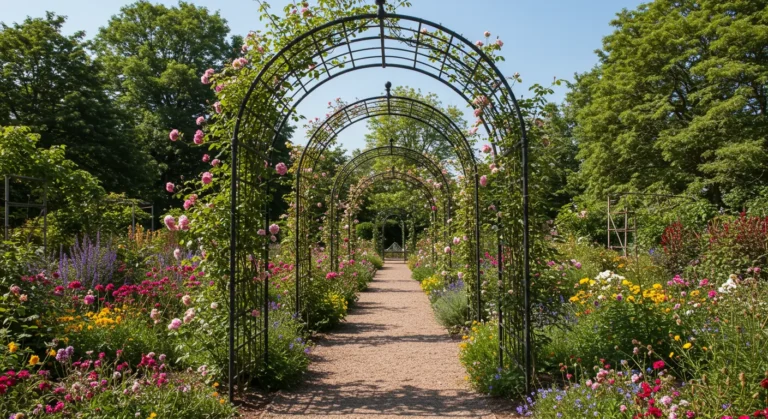
Garden arches have been a staple in gardens for thousands of years. They highlight climbing plants, mark different garden areas, and add beauty. When looking at garden arch ideas, think about their purpose and beauty in your garden.
A diy garden archway adds a personal touch to your garden. You can choose from many materials and designs. For instance, a homemade garden arch from wood or metal supports climbing plants and adds elegance.
Some common uses for garden arches include:
- Creating shaded areas, perfect for hot weather
- Highlighting climbing plants, like roses and clematis
- Marking different garden areas, such as a vegetable garden or a walking path
Adding a garden arch to your landscape boosts curb appeal and shows off your style. Whether it’s a classic wooden arch or a modern metal one, it’s both beautiful and useful in your garden.
Essential Tools and Materials for Your DIY Garden Arch
To start your DIY garden arch project, you need the right tools and materials. For a wooden arch, you’ll need metal cattle panels, T-posts, zip ties, and a post pounder. The cost can vary, but the right materials will make a sturdy and attractive arch.
You’ll also need 4×4 posts, 2×4 boards, and 2×2 boards. The number of screws you’ll need, like 2.5 inches exterior wood screws, will depend on your design. Using cedar or redwood is a good choice for durability, as they resist moisture and rot.

When planning your arch, think about the size and space you have. A good width is 72 inches, and the height should be about 7 feet. With the right tools and materials, you can create a beautiful arch that will make your yard look great and last for years.
Choosing the Perfect Location for Your Garden Arch
Choosing the right spot for your diy garden arch is key. It should look good and fit well with your garden. Think about how much sun it gets and what plants you’ll use.
The height of your garden arch plans matters too. Most arches are 7 to 8 feet tall, perfect for climbing plants. But, smaller gardens might need arches around 6 feet for a snug feel. Bigger gardens can have arches up to 9 feet for a big statement.
Arch materials like wood, metal, and PVC have their own height ranges. Wooden arches work best at 6 to 7 feet, fitting in with nature. Metal arches, at 7 to 8 feet, are durable and elegant. Here’s a quick guide to heights for each material:
- Wooden arches: 6-7 feet
- Metal arches: 7-8 feet
- PVC arches: 7-8 feet
Keep your plants trimmed to keep them looking good and not too tall. This way, your diy garden arch will be a hit in your garden, thanks to your garden arch plans.

Getting your garden arch right takes planning and care. With the right spot and design, your diy garden arch will be a beautiful centerpiece. It will make your yard look even better.
| Material | Suitable Height |
|---|---|
| Wooden arches | 6-7 feet |
| Metal arches | 7-8 feet |
| PVC arches | 7-8 feet |
Planning Your DIY Garden Arch Project
Planning is crucial when building a garden arch. First, measure the space where you plan to put the arch. This will help you pick the right size. Use a measuring tape to mark the area and understand the space better.
It’s also important to check for underground utilities. This step prevents damage to your arch or the area around it. After checking the space, think about the design and materials for your arch. Match the arch’s style with your garden’s theme and the plants you’ll use.

When planning, consider the materials, arch size, and location in your garden. Good planning ensures your arch looks great and adds beauty to your outdoor space. With patience and creativity, you can make a beautiful and useful garden arch.
| Material | Quantity | Purpose |
|---|---|---|
| Cattle panel | 1 | Trellis structure |
| U-posts | 4 | Support posts |
| Tie wire | 1 roll | Securing panel to posts |
Step-by-Step Guide to Building a Wooden Garden Arch
Building a wooden garden arch is a fun DIY project. You’ll need the right tools and materials to make a sturdy arch. Start by preparing the support posts, which are the arch’s foundation.
A wooden garden arch diy project starts with the support posts. Dig holes for them and set them in place, ensuring they’re level and secure. After that, you can start building the arch using 2x4s and 2x6s.

When building the arch, remember to leave space for climbing plants. A diy garden arch adds beauty and function to your garden. With the right materials and tools, you’ll make an arch that will impress everyone.
When building a wooden garden arch, consider the wood type, arch size and design, and plant choice. With planning and creativity, you can make a beautiful and useful arch that will last for years.
Creating a Metal DIY Garden Arch
A metal garden arch can bring modern elegance to your outdoor area. You can make a beautiful metal garden arch diy with the right materials and creativity. You’ll need metal panels, star posts, and galvanized wire ties to start.
Choosing the right metal panel size is crucial. A panel that’s 82 mm thick is best for strength. Decide on the panel length based on your arch’s height and width. For example, a 2.4 meters tall and 1.2 meters wide arch needs a 5.5 meters long panel.

Metal garden arches are great for supporting plants. They increase garden bed area and boost plant growth. You can grow plants like pumpkins and cucumbers on them. Use galvanized wire ties to hold the panels in place, as plastic ties won’t do.
Here are important tips for making a metal diy garden arch:
- Choose high-quality materials, like metal panels and star posts
- Figure out the panel’s length and thickness
- Secure the panels with galvanized wire ties
- Think about the plants you’ll grow and design your arch accordingly
By following these tips and being creative, you can make a beautiful metal garden arch diy. It will add modern elegance to your outdoor space. A diy garden arch is a cost-effective way to enhance your garden.
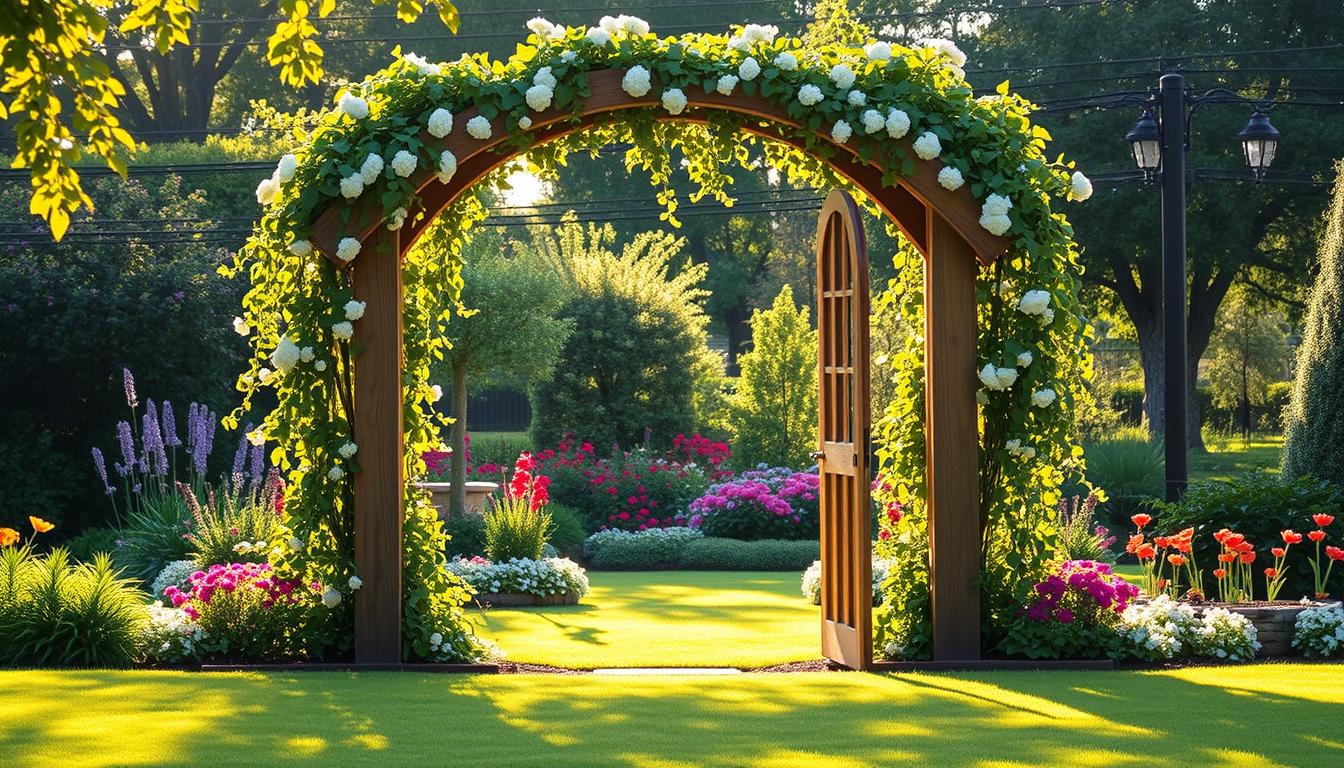
Incorporating Climbing Plants and Decorations
Adding climbing plants and decorations to your garden arch ideas can make your diy garden archway more beautiful and useful. Choose plants like roses, clematis, and wisteria for your arch. They look great, provide shade, and make your garden feel more private.
A homemade garden arch can become a beautiful centerpiece with the right decorations. Consider hanging baskets, wind chimes, and solar lights. These add personality and make your garden arch warm and inviting at night.
Best Climbing Plants for Garden Arches
- Roses: A classic choice for garden arches, roses come in a variety of colors and are relatively easy to train.
- Clematis: These flowering vines are perfect for adding a pop of color to your garden arch and can be trained to climb up the structure.
- Wisteria: With its delicate, fragrant flowers, wisteria is a popular choice for garden arches and can be trained to cascade down the sides of the structure.

Training Plants on Your Arch
Training plants on your garden arch takes time and care. Begin by planting the climbing plant at the arch’s base. Then, gently wrap the stems around the structure. As the plant grows, keep guiding it up the arch. Use twine or wire to hold the stems in place if needed.
| Plant | Training Method |
|---|---|
| Roses | Twine or wire |
| Clematis | Gentle twining |
| Wisteria | Wire or trellis |
Maintaining and Protecting Your Garden Arch
To keep your diy garden arch looking great, regular care is key. Check it seasonally for damage or wear. Simple steps can protect your arch from the weather and keep it in top shape.
Prune climbing plants to balance water and sunlight. Paint or seal your arch to shield it from the elements. Also, inspect for damage or instability and fix it to keep your arch safe.

- Regularly clean your arch to prevent dirt and debris from building up
- Check for any signs of pest or rodent infestation, and take action if necessary
- Consider adding a protective coating to your arch to shield it from the elements
By following these tips, your diy garden arch will stay beautiful and useful for many years.
| Maintenance Task | Frequency |
|---|---|
| Pruning climbing plants | Monthly |
| Inspecting for damage | Quarterly |
| Repainting or resealing | Annually |
Troubleshooting Common Garden Arch Issues
When you learn to build a garden arch, you should think about possible problems. Instability is a common issue, often due to poor anchoring. Make sure your arch is anchored well, with a hole at least 18 inches deep. Check your arch every few months, especially after bad weather, to catch any stability problems.
Damage to the arch’s structure is another issue. For an easy fix, use eco-friendly materials like recycled wood or metal. These options can be cheaper. For example, use 10” long spikes for ground support and 4 full-size cinderblocks for extra strength.
Some key things to consider when fixing garden arch problems include:
- Regular checks to spot problems early
- Using eco-friendly materials for repairs to help the environment
- Looking for affordable solutions to save money
Being proactive helps your garden arch last for many years. Always follow the right installation and care steps. If you’re unsure, don’t be afraid to ask for help.

With proper care and maintenance, your garden arch can become a stunning focal point in your yard, providing a beautiful structure for climbing plants to thrive.
Conclusion: Enjoying Your Custom Garden Arch Creation
Now that your diy garden arch is done, you can enjoy its beauty and usefulness. Making a homemade garden arch is a fun project that lets you add your personal touch to your yard. Studies show that 65% of homeowners like to DIY their outdoor projects, showing a big interest in making outdoor spaces their own.
Building a diy garden arch not only adds a unique feature to your yard but also boosts your property value. A well-made garden arch can bring joy and beauty for years. With the right materials and tools, you can make a stunning garden arch that shows off your style. Look at different garden arch ideas to find one that fits your taste and space.
A homemade garden arch is more than just a decoration; it’s also useful. It can support climbing plants, offer privacy, and even be a garden entrance. With a bit of creativity and basic DIY skills, you can make a beautiful and useful garden arch that will impress your neighbors.